Hi everyone!
So I have been getting caught up on my Project Life and so excited to show you. I seriously need to print out a handful of pictures and then I am completely caught up! Whoop whoop! :)
As I was setting up my pics to be printed I thought I'd kind of take you through my process of how I pick which pictures to use and how I have them printed to fit into the PL page protectors.
I usually try to sit down once a week and print off a batch of pictures for the week because:
A) It's cheaper that way
B) it helps me stay up-to-date
First things first. I ALWAYS use Walgreens to print my pics. I have never had a problem with them or their processing/quality and it doesn't hurt that they are just down the street from me ;) {Also, a friend of ours is the manager of the photo dept. Not gonna lie: it's pretty sweet that I can just walk in and they have my order waiting for me. :) }
The first thing I do is just go to Walgreens website and upload my pics. I do NOT pre-plan which pictures I'm going to use. I literally just go through and click on the ones I like. I have tried in the past to pre-plan what pictures for what pocket and it is waaaay too stressful and takes too much time.
The page protectors I use have pockets for 4 4x6 horizontal and 4 3x4 vertical pictures/cards. Because of this, I need to change the size of my vertical pics to 3x4. Insert Picasa photo editing. I ALWAYS go through picasa to import my pictures off my memory card, and then do any light editing that needs done. THEN I go to Photoshop Elements if I need to.
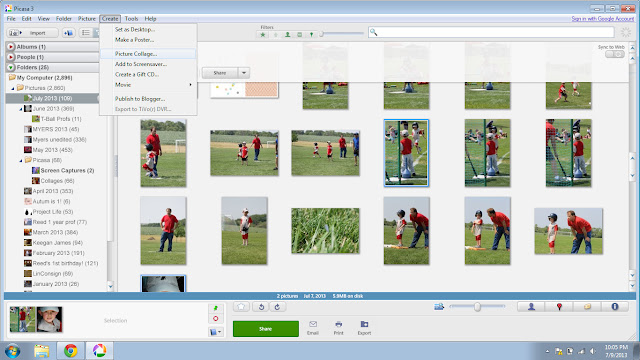
Obviously 2 vertical 3x4's equal 1 horizontal 4x6 so what I do is make a picture collage of 2 vertical pictures that I want. Let me show ya:
What you have to do is pin (Click on the picture you want, then click on the little green push pin) the 2 verticals you want to use down in the tray at the bottom. Then click on Create, at the top of the screen, and pull down and click on Picture Collage.
You have to make sure that under settings you have Grid selected, the drop down menu has 4x6 small print selected and a horizontal collage is selected. Then click on Create Collage. Simple right?
OK now go back to Walgreens Photo Center and find the pictures that you just used to make a collage. Delete them. I know it's hard but it's what ya gotta do. :)
Now go back and upload the collage you just made. It will be in a folder in your pictures named Picasa. Then usually a subfolder called Collages. Complicated, I know. :) If you didn't change the name of the collage it will be named the name of what folder the pictures came out of. My pics were in "July 2013" so it named the collage July 20138. {I have quite a few collages from July. 8 to be exact ;) }
Now add all those pictures to your cart and checkout!
When you get home you just have to use your paper trimmer, or scissors if you have a steady hand, and cut it right down the middle to make 2 3x4s.
I hope that all made sense. I feel like I typed a lot and I'm not sure it all came across right. If you have any questions don't hesitate to comment down below and I'll do my best!
Stay tuned, as soon as these pictures are picked up I will be totally caught up! :)


No comments:
Post a Comment